17 Cheap Outdoor Kitchen Ideas
Dreaming of summer cookouts in your very own outdoor kitchen? You don’t need a celebrity-sized budget to make it happen. Outdoor cooking spaces have become the backyard’s hottest trend, and clever homeowners everywhere are finding budget-friendly ways to create them.
From repurposed materials to simple DIY projects, transforming your patio into a functional cooking area is totally doable. We’ve gathered 17 affordable outdoor kitchen ideas that combine style and practicality. These smart solutions will help you build that perfect space for grilling, dining, and making memories under the open sky.
1. Pallet Wood Counter
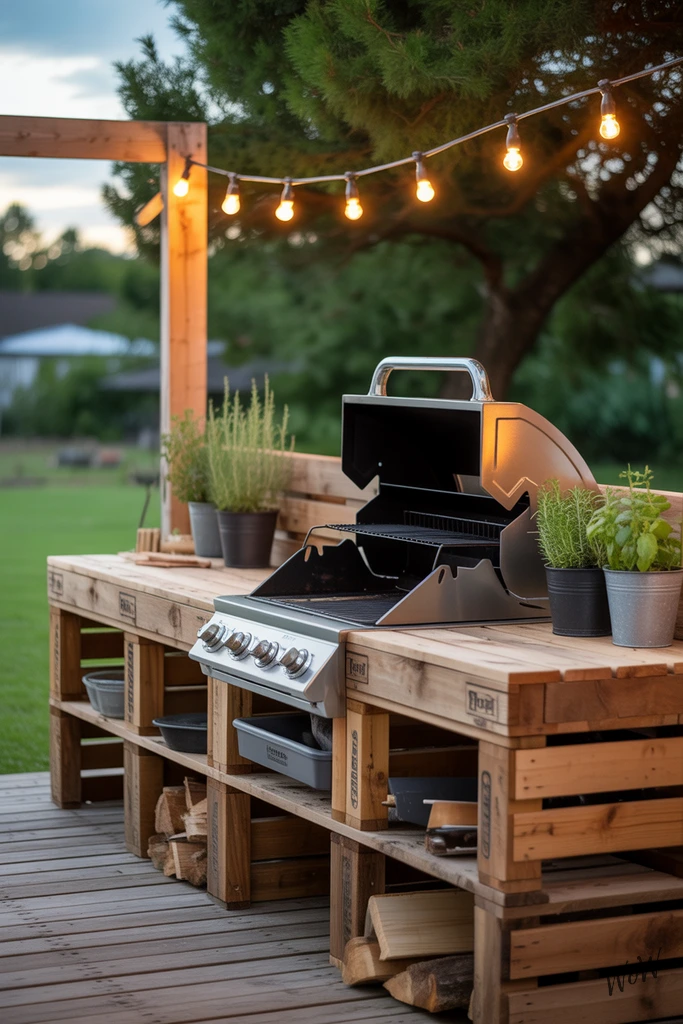
Want that cozy, backyard bistro vibe without spending a fortune? A rustic pallet wood counter is your ticket. Grab some sturdy pallets (make sure they’re heat-treated, not chemically treated), and stack or screw them together to create a simple, weathered counter. Cut out a spot for a built-in grill—measure twice, cut once!
Add open shelving underneath for storing firewood, pots, or utensils. Surround your counter with potted herbs for easy picking and that lush, lived-in look. String lights overhead tie it all together, casting a golden glow as the sun sets, you’ll feel like you’re in a countryside getaway.
Tips to Get This Look
1. Embrace Natural Wood Tones
Skip the paint, let the wood’s natural grain shine, and don’t worry about minor imperfections—they add character.
2. Mix Modern with Rustic
Pair your weathered pallet counter with a sleek, stainless steel grill insert for contrast; it makes the whole setup look intentional, not accidental.
3. Layer with Greenery
Use lots of potted herbs—rosemary, basil, and mint are perfect. Cluster them around the counter for an inviting, edible border.
4. Open Shelves, Open Access
Install simple open shelves underneath for storing wood, tools, and dishes. It keeps essentials handy and adds that unfussy, rustic charm.
5. Cozy Lighting is Key
Hang warm string lights overhead, the glow will make your outdoor kitchen feel magical even on a shoestring budget.
2. Cinder Block BBQ Stand
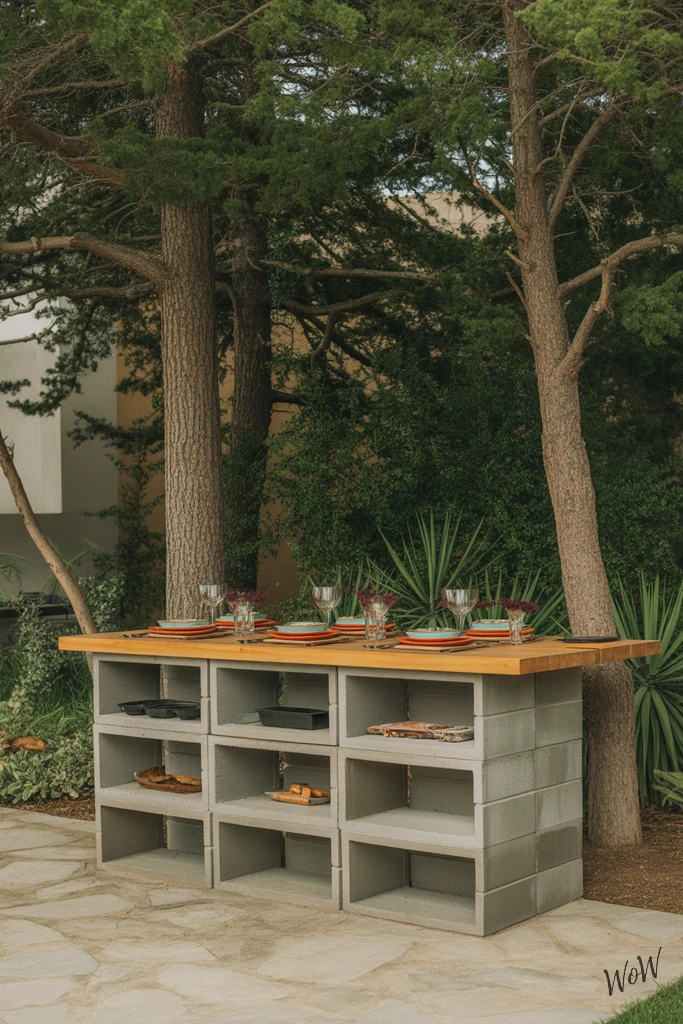
Ready to upgrade your backyard BBQ game without dropping serious cash? Stack up some cinder blocks in a geometric pattern (leave a few gaps for storage cubbies), then top it off with a thick wooden slab—boom, you’ve got an industrial-style BBQ stand that looks designer but costs next to nothing.
On top, toss down your grill, line up colorful plates and utensils, and you’ve got a setup that’s as practical as it is stylish. The cinder blocks add texture and keep things sturdy, while the wood brings warmth. Nestle your station under tall trees for shade and set it all on a natural stone patio to really nail the vibe.
Tips to Get This Look
1. Play With Block Patterns
Don’t just stack the blocks—experiment with different arrangements, leave some spaces open for a fun, geometric look and handy cubbies.
2. Stick to Neutral Tones
Use gray or white-washed blocks and a natural wood top, it keeps the look clean and lets your colorful plates and utensils pop.
3. Mix Up Your Textures
Pair the rough cinderblocks with a smooth, sanded wood slab. Add a few metal or ceramic accents for even more texture contrast.
4. Add Comfy Outdoor Seating
Go for simple, weatherproof benches or colorful metal chairs, it’s practical and brings personality to the setup.
5. Accessorize With Bold Tableware
Don’t be afraid to go bright—stack up colorful plates, napkins, and a few potted plants for a playful finishing touch.
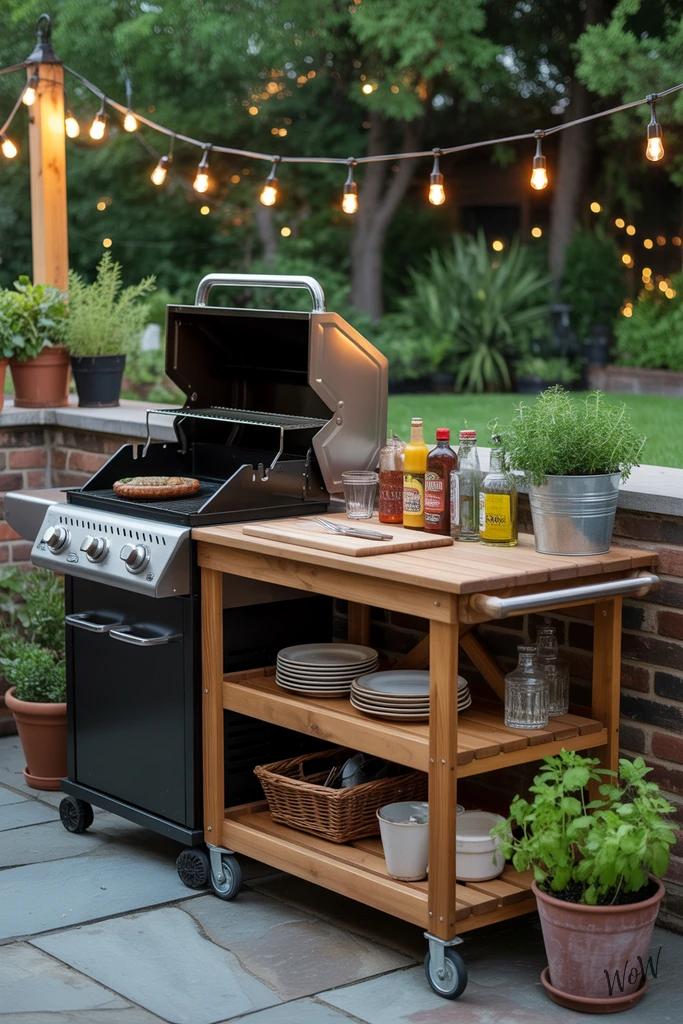
3. Portable Grill Cart
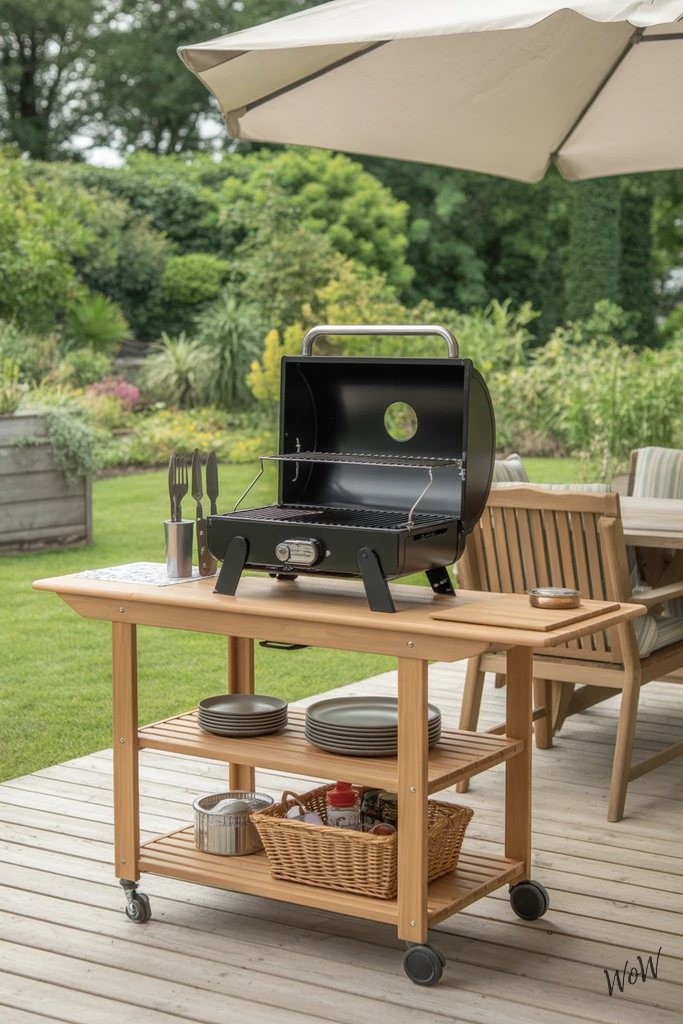
A compact wooden grill cart is a total game changer for small patios or decks, letting you roll your whole BBQ setup wherever the party happens to be. This one’s got it all — a sturdy cutting board top, a spot for your portable grill, a handy utensil rack for tongs and spatulas, plus a bottom shelf loaded with plates and a basket of grilling must-haves.
Tuck it under a big umbrella for shade and you’ve got a legit grilling station with garden views, no big budget needed.
Tips to Get This Look
1. Go for Warm Wood Tones
A natural wood cart adds instant warmth and blends right in with outdoor greenery, painted or stained wood both work, just seal it for weather resistance.
2. Mix in Metal Accents
Choose a cart with metal racks or handles—those little touches break up the wood and echo your grill’s finish.
3. Style With Simple Neutrals
Stack plain white or gray plates on the lower shelf, they’ll look crisp against the wood and make your food pop.
4. Add Texture With Baskets
A woven basket isn’t just cute, it’s a practical way to corral condiments or grilling tools.
5. Don’t Skip the Shade
A big neutral umbrella makes the whole area feel inviting (and keeps you from sweating over your burgers).
4. DIY Fire Pit Table
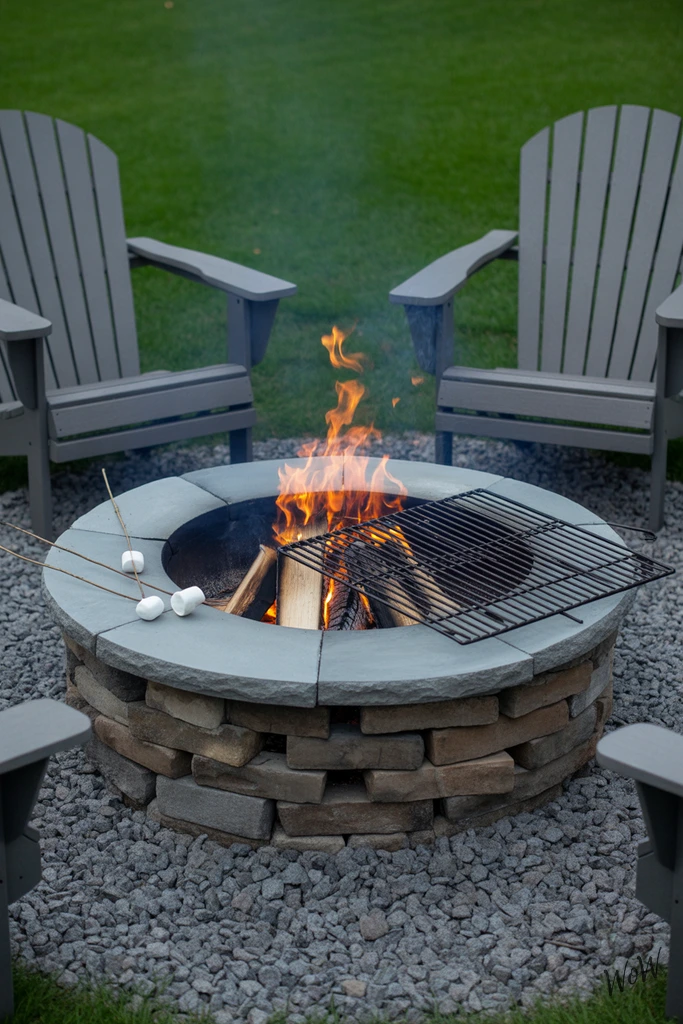
Think gathering around a circular stone fire pit that’s more than just a place for flames—it’s got a wide, flat edge, doubling as a makeshift countertop for prepping s’mores, lining up hot dog buns, or even setting down drinks.
Build it by stacking pavers or flat stones in a circle, leaving the top ring extra wide. Place Adirondack chairs in a cozy ring on a bed of gravel (no muddy feet here), and position a grill grate over part of the fire—now you’re roasting marshmallows and grilling burgers like a pro. Warm flames, crackling wood, and laughter: you just made your backyard the hangout spot.
Tips to Get This Look
1. Choose Warm, Natural Stone Colors
Go for earthy tones—think tan, gray, or buff—that blend with nature and look great at sunset, avoid anything too glossy or modern.
2. Wide-Edged Fire Pit for Function
Use pavers or capstones at least 8-12 inches wide for the top ring, it gives you plenty of real estate for trays, plates, and marshmallow supplies.
3. Adirondack Chairs for Comfort
Classic wooden or sturdy plastic Adirondack’s invite guests to kick back, and they’re roomy enough for cozy blankets.
4. Gravel Base for Easy Upkeep
Spread pea gravel or crushed stone under the whole setup, it keeps the area tidy, drains well, and adds rustic texture.
5. Cozy Evening Lighting
String up some warm white outdoor lights or use lanterns nearby, this soft glow makes your fire pit area feel magical after dark.
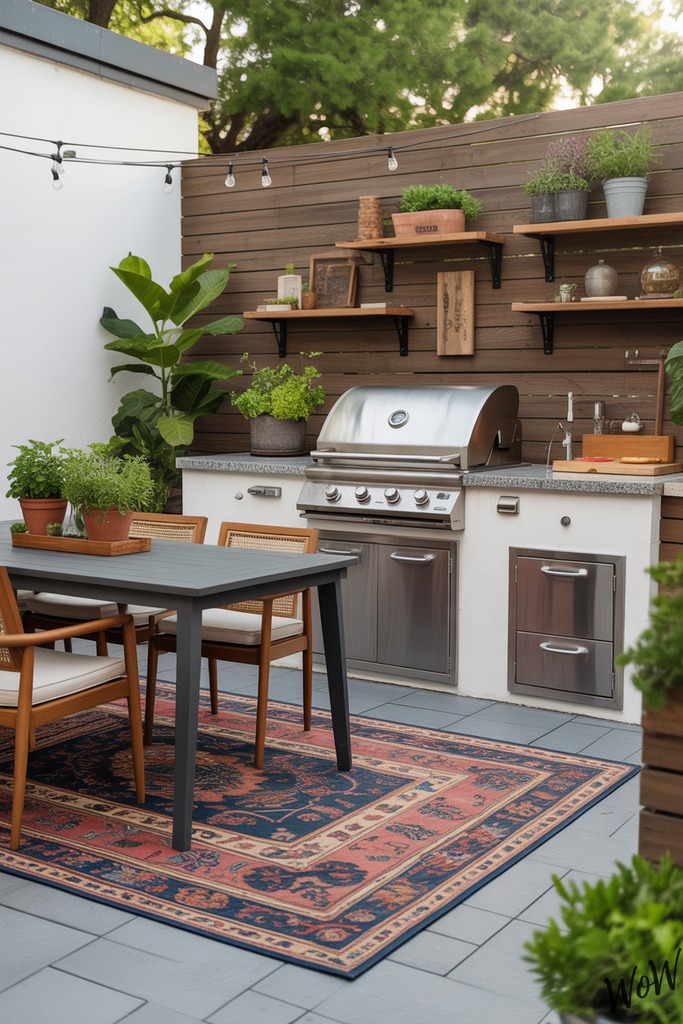
5. Concrete Countertops
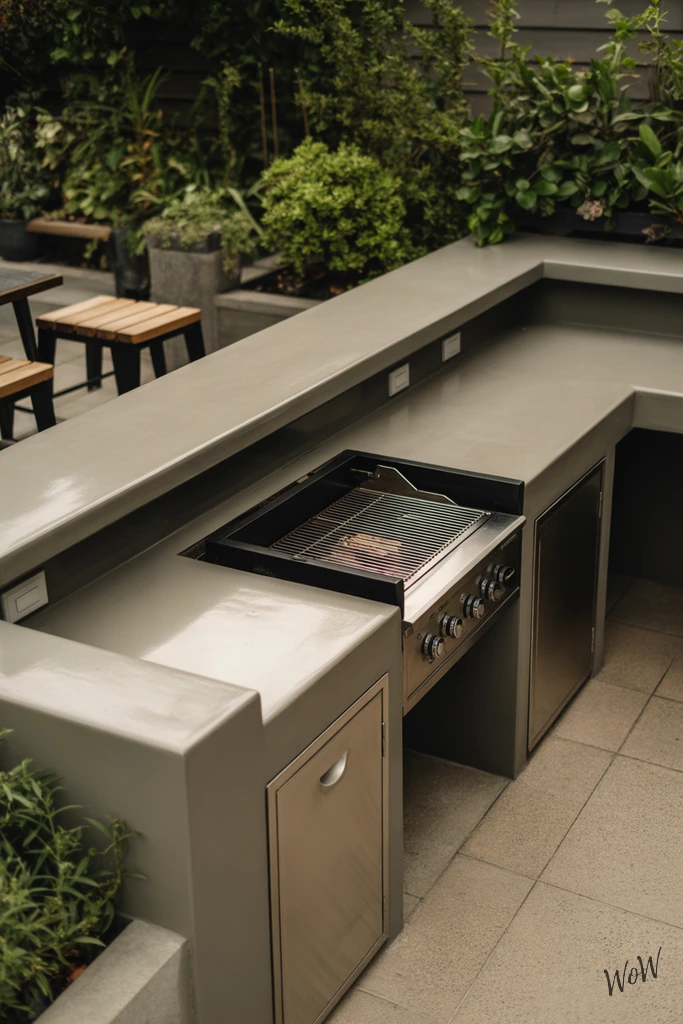
Concrete countertops are the MVP of outdoor kitchens—they’re durable, surprisingly affordable, and look high-end without trying hard. In this setup, an L-shaped slab with a dramatic waterfall edge wraps around a built-in charcoal grill, giving you chef-level vibes for backyard BBQs.
The minimalist, smooth finish contrasts perfectly with the surrounding greenery, especially when you tuck weatherproof storage underneath and add a few simple bar stools. The best part? This clean-lined look actually gets better with age, picking up character over time—like good jeans or a cast iron pan.
Tips to Get This Look
1. Go Neutral, Not Boring:
Stick to classic concrete grey or soft charcoal for your countertops. It’s timeless and won’t clash with your garden. If you want a warmer vibe, ask your installer about tinting the concrete with subtle earth tones.
2. Waterfall Edge Wins:
That “waterfall” drop on the counter’s side is what makes it look expensive, even if you DIY. It also hides storage or appliances underneath, keeping everything tidy.
3. Mix Up the Seating:
Choose slim, metal or teak bar stools—they’re weatherproof and simple, letting the counter be the star. Keep the lines clean and skip fussy cushions.
4. Texture Is Your Friend:
Balance all that smooth concrete with lush greenery or climbing plants around the kitchen. Think herbs in pots, or a vine trailing nearby for a cozy, organic feel.
5. Minimal Decor, Maximum Impact:
Don’t clutter the space, just add a few statement pieces like a matte black outdoor lantern or a sleek tray for grilling essentials.
6. Repurposed Bar Cart
Turn a basic wooden bar cart into your new backyard MVP—an outdoor cooking station that’s both stylish and practical. Park it next to your charcoal grill, load the shelves with grilling essentials, and use the top as a mobile prep area (hello, easy access to your cutting board and sauces).
This setup keeps everything you need within arms reach, saves you trips inside, and looks awesome under string lights, surrounded by potted herbs. Plus, you’re reusing furniture you already have or can snag cheap, so it’s a win for your wallet and the planet.
Tips to Get This Look
1. Stick With Natural Wood Tones
Choose a cart with a rustic, unfinished vibe—think warm, natural wood. If you’re refreshing an old cart, a quick sanding and wood oil can bring it back to life.
2. Add Cozy String Lighting
Drape string lights above your station for a welcoming glow; it makes evening grilling feel extra special, and you don’t need to wire anything fancy.
3. Mix in Textures with Herb Pots
Cluster a few terracotta or metal pots filled with fresh herbs nearby, it adds greenery, scent, and a homey touch right where you cook.
4. Use Simple, Durable Plates
Stock the shelves with sturdy, unbreakable plates (melamine or enamelware), which look great and handle outdoor use with zero fuss.
5. Accessorize with Bold Cutting Boards
A chunky wood cutting board looks great on top of the cart, doubling as prep space and rustic decor.
7. Foldable Prep Table
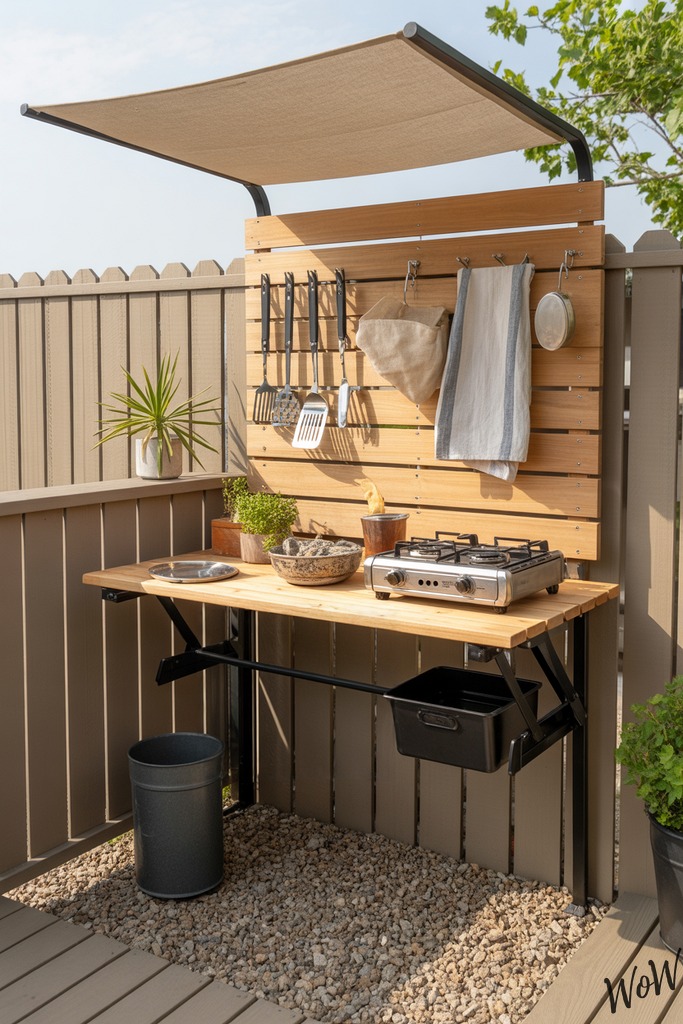
If you’re short on patio space but big on outdoor cooking dreams, a compact foldable prep table is a total game-changer. Mount it right against your fence or balcony—when you need to whip up a meal, just fold it out, and you’ve got instant counter space.
This setup in the image nails the essentials: a sturdy wooden surface, storage hooks for your tongs and spatulas, and a portable gas stove ready for action. There’s even a simple canvas awning for shade so you’re not sweating over your veggies, and since it’s above gravel, cleanup is a breeze. When you’re done, fold it back up, and reclaim your patio for lounging. Easy, efficient, and seriously affordable.
Tips to Get This Look
1. Go for Neutral Wood Tones
Choose a light, natural wood finish for your table. It gives a clean, modern vibe and won’t clash with your fence or outdoor furniture.
2. Maximize Hook Storage
Install a row of simple metal hooks under the tabletop—hang everything from cutting boards to grill tools, you’ll keep the surface clear and organized.
3. Add Texture with Canvas
A plain canvas awning softens the space and gives that relaxed, outdoor kitchen feel. Stick to beige or off-white for a timeless look.
4. Mix in Pops of Green
Pile on the fresh veggies, or add a small potted herb or two. The green brightens up the neutral palette and makes your prep area look fresh.
5. Gravel for Easy Cleanups
If you can, set the whole thing up over gravel. It hides spills and gives your kitchen a fun, low-key courtyard vibe.
9. Mason Jar Herb Garden
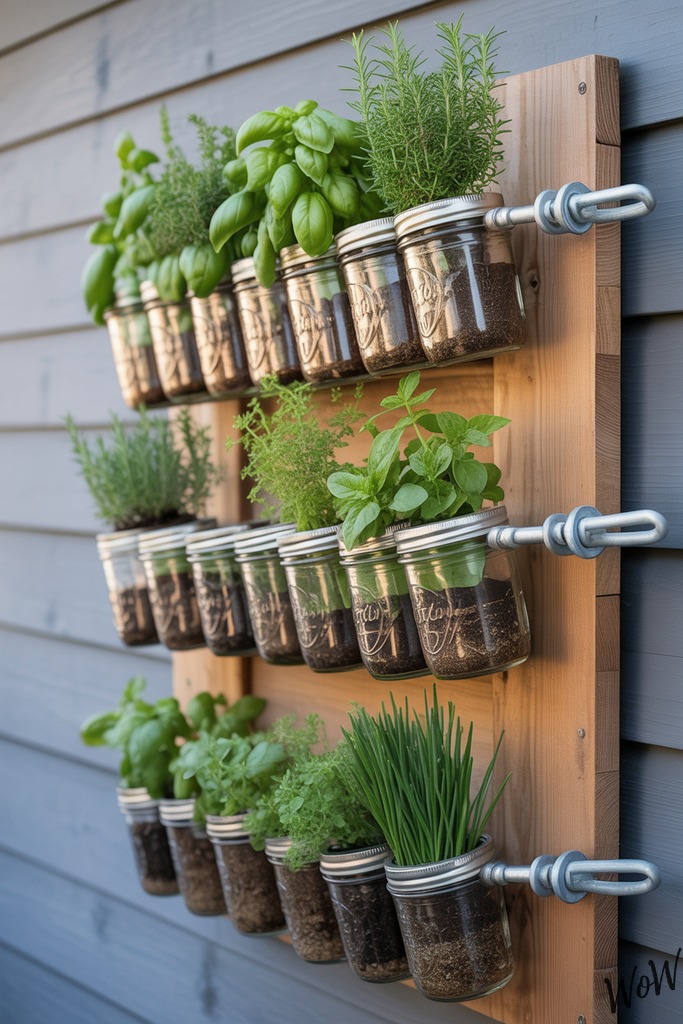
If you want fresh herbs right where you cook, this mason jar herb garden is a total game-changer. Mount a wooden board on your outdoor kitchen wall, then attach clear mason jars (use hose clamps or sturdy metal brackets) in a neat vertical row.
Fill with potting soil and your favorite herbs—think basil, mint, rosemary, thyme, and chives. The clear jars look amazing, letting you see the roots and soil, plus chalkboard labels add a rustic touch. Not only do you get a mini garden, you’ll save cash on store-bought herbs and add a cool, green vibe to your cooking space.
Tips to Get This Look
1. Play With Natural Wood
Choose a raw or lightly stained wooden board for mounting, it adds warmth and that outdoorsy feel.
2. Stick to Clear Glass
Use classic clear mason jars, they keep things visually light and let you monitor root health (plus, it looks cool).
3. Chalk It Up
Label each jar with a mini chalkboard sticker or paint a small patch with chalkboard paint—swap out herb names as you rotate plants.
4. Keep Counters Simple
Pair your herb wall with a basic, sturdy countertop—think concrete or unfinished wood so the herbs are the star.
5. Add a Pop of Green
Let your herbs do the talking, but tuck in a few colorful pots or a leafy hanging plant nearby for extra lushness.
10. Hanging Utensil Rack
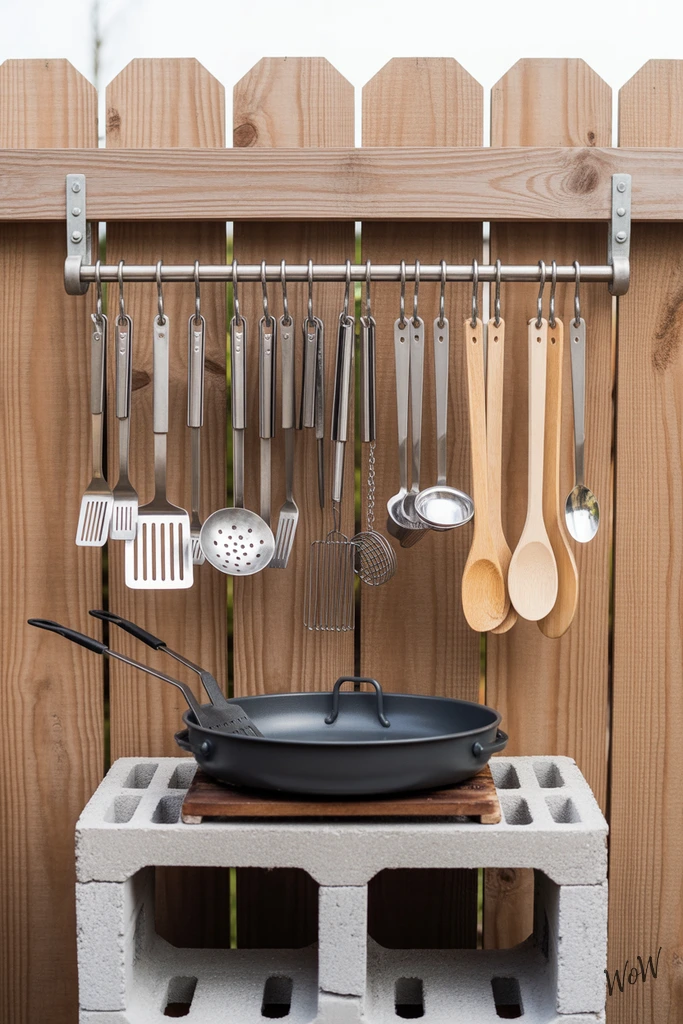
Forget digging through drawers or losing spatulas in the grass. Mounting a hanging rail system on your wooden fence is a total game-changer for outdoor cooking, especially if you’re working with a basic cinder block station.
Just screw in a sturdy rail (or even a simple metal rod), then use S-hooks to dangle your frequently-used utensils—spatulas, tongs, skewers, and wooden spoons. Organize them by size for that Instagram-worthy, super functional vibe. Not only does this keep everything within arm’s reach, it looks neat, adds a touch of rustic charm, and costs next to nothing.
Tips to Get This Look
1. Mix Stainless and Wood:
Blend shiny stainless steel utensils with classic wooden spoons, the combo pops against a plain wood fence and keeps things looking intentional.
2. Keep Furniture Simple:
Pair your rail with a no-fuss cooking station—think cinder blocks and a basic grill, it’s budget-friendly and lets the utensil display stand out.
3. Use Contrasting Hooks:
Choose black or matte S-hooks for a little visual interest, they’ll stand out against both the wood and the metal utensils.
4. Add Texture with Plants:
Tuck a small potted herb or trailing plant near the rail, softening the look and making your setup feel more inviting.
5. Stick to a Neutral Palette:
Stick with grays, natural wood, and metal tones for a cohesive, unfussy outdoor kitchen that looks pulled together without trying too hard.
11. Outdoor Rug Flooring
Adding an outdoor rug is one of the easiest ways to transform a basic backyard kitchen into a cozy, inviting spot. Instead of spending big on pricey deck tiles or stone, just roll out a bold, weatherproof rug—it anchors your dining space, adds a pop of color, and feels great underfoot (especially if you’re barefoot grilling). The best part? You can swap it out with the seasons, or whenever you’re ready for a refresh.
Tips to Get This Look
1. Go Bold With Color
Choose a rug with vibrant patterns or rich tones, it’ll instantly set a happy, relaxed mood—don’t be afraid of reds, blues, or sunny yellows.
2. Mix Up Textures
Pair the softness of the rug with rough wooden counters, woven baskets, and plenty of potted plants for a layered, rustic vibe.
3. Keep Furniture Simple
Opt for lightweight plastic or resin chairs, they’re easy to move and clean, plus they keep the space feeling casual and unfussy.
4. Light Up the Space
String lights overhead, they’ll make evening dinners feel magical and cozy without costing a fortune.
5. Accessorize With DIY Touches
A homemade wooden table or recycled crates add that personal, laid-back charm and keeps your budget in check.
12. String Lights Ambiance
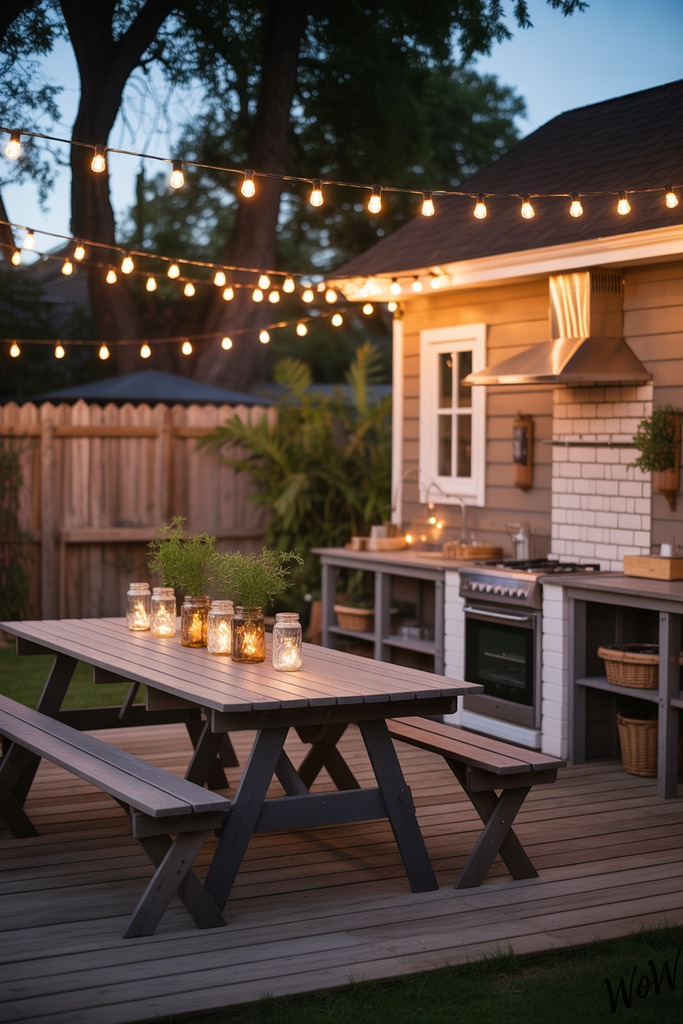
Nothing transforms a backyard kitchen like string lights, they’re the secret sauce for cozy, magical evenings. Drape warm white bulbs overhead, zigzagging above your counter and seating area.
Combined with mason jar lanterns and simple seating, string lights instantly turn a basic setup into a place you’ll want to linger long after sunset. It’s budget-friendly, super easy to install, and the soft glow makes everything (and everyone) look good.
Tips to Get This Look
1. Go Warm with Bulbs:
Choose warm white or soft yellow string lights—the cooler blue tones can feel harsh and less inviting.
2. Mix Up Seating:
Add a couple of mismatched chairs or a weathered bench for laid-back, casual vibes; bonus points for throw pillows in earthy tones.
3. Layer Textures:
Place a woven outdoor rug underfoot, it’ll add comfort and visually tie the space together against the wooden counter and fence.
4. Use Mason Jars (Everywhere):
Turn mason jars into lanterns or utensil holders, fill them with fairy lights or tea candles for extra sparkle along the counter.
5. Keep Decor Simple:
Don’t overthink it—just drape lights, set out lanterns, and let the wood, metal, and greenery be the stars.
13. Recycled Brick Grill Base
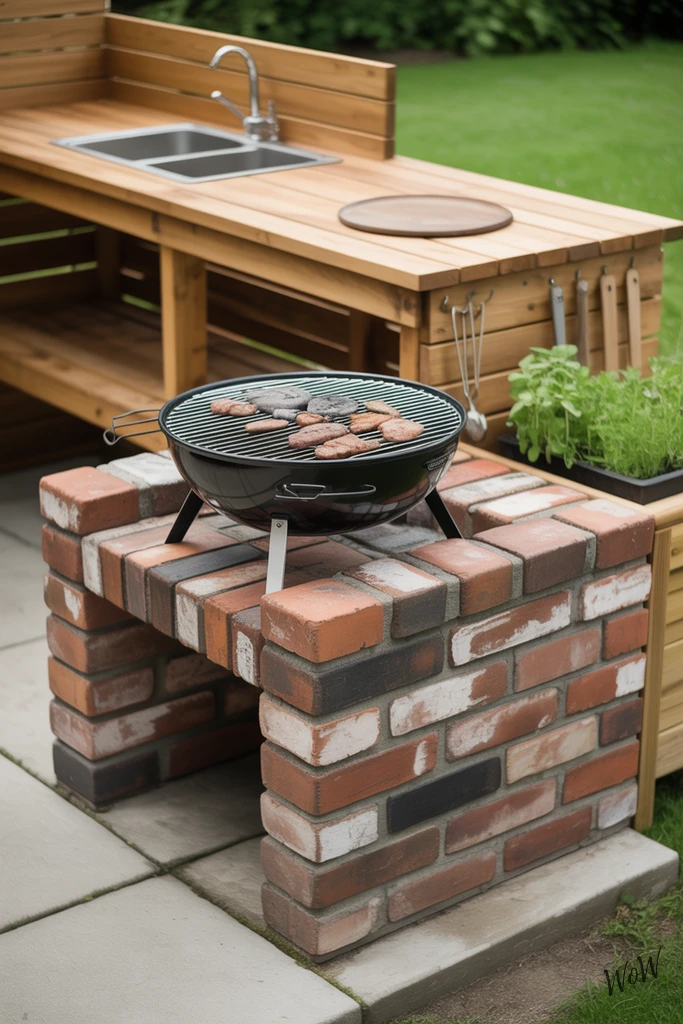
Turning old bricks into a grill base is one of those projects that’s way easier than it looks, you’ll get a seriously cool backyard feature without blowing your budget. Just stack weathered bricks in a simple, solid pattern for that rustic, mismatched vibe—no need to fuss over perfection.
Pop a charcoal grill on top, add a wood countertop for prepping, and you’ve got an outdoor kitchen that feels both custom and down-to-earth. If you want to go the extra mile, hook up some basic utensil hangers and set out a couple of potted herbs nearby, the whole thing just screams backyard summer nights.
Tips to Get This Look
1. Mix Up Brick Colors:
Don’t stress about getting bricks that match. The charm comes from mixing reds, browns, and even a chipped edge or two.
2. Add a Simple Wooden Counter:
A basic slab of weathered or stained wood makes a perfect prep station—just seal it so it can handle rain.
3. Go Low with Furniture:
Keep seating informal—think foldable wooden chairs or an old bench—nothing too polished.
4. Layer Textures:
Set concrete pavers underfoot, then toss a woven outdoor rug nearby for a cozy, casual feel.
5. Keep Decor Minimal:
Hang a few essential tools on basic S-hooks, and let a small herb garden in terra cotta pots do the decorating for you.
14. Wooden Crate Storage
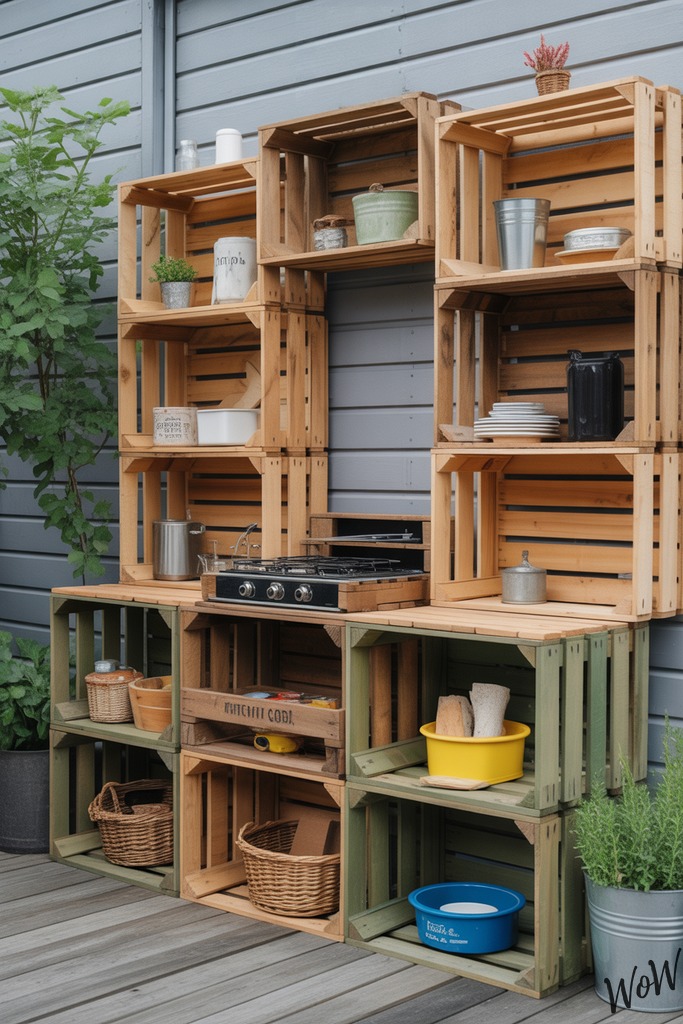
If you want a budget-friendly outdoor kitchen that actually looks charming, wooden crates are the secret weapon. Stack them up—sideways or upright—to build easy shelving for dishes, pantry staples, or firewood. With a quick coat of weatherproof paint in bold or muted shades, they’ll stand up to the elements and add a pop of color to your space.
Use a couple crates as open cubbies under a repurposed pallet countertop, then tuck in baskets or jars for utensils and spices. Not only is this setup cheap and flexible, it’s also easy to rearrange if your needs (or your parties) change.
Tips to Get This Look
1. Pick Weatherproof Paint:
Choose outdoor-rated paint in fun hues or classic neutrals, it protects the wood and adds personality.
2. Mix and Match Furniture:
Pair your crate shelves with foldable camping chairs or a secondhand bench for a laid-back vibe, don’t be afraid to mismatch.
3. Layer Textures:
Add a rough-hewn pallet counter, galvanized buckets, and woven baskets for extra visual interest.
4. Accessorize with Greenery:
Slip in potted herbs or trailing plants on the shelves, it softens the look and keeps fresh ingredients handy.
5. Keep It Clutter-Free:
Only store what you actually use—overstuffed crates make the whole kitchen feel messy.
15. Basic Stainless Steel Sink
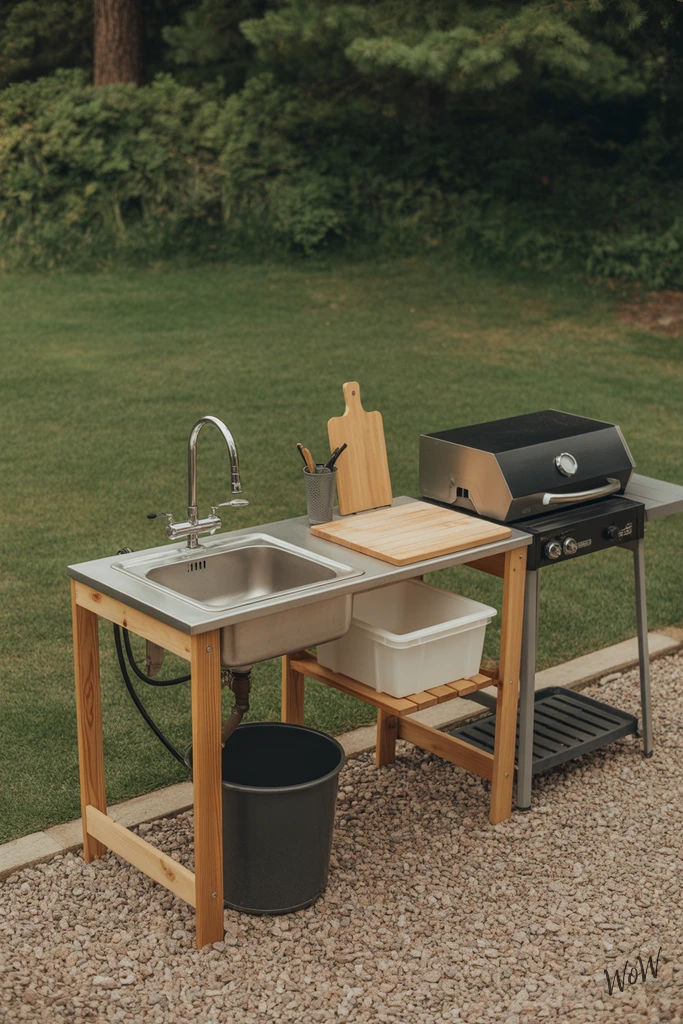
A basic stainless steel sink is a game-changer for any minimalist outdoor kitchen, you’ll love how easy it is to clean and maintain. Instead of a fancy setup, just hook up a garden hose for water and let the gray water drain into a big bucket underneath — no plumbing required!
Supported by a simple wooden frame (think: two-by-fours and plywood), this setup is sturdy without being bulky. The stainless steel gives off a sleek, no-nonsense vibe, and it stands up to weather like a champ. Keep the area tidy with plastic storage bins for utensils, and toss a wooden cutting board on top for a workspace that’s ready for anything.
Tips to Get This Look
1. Stick to Neutrals:
Choose stainless steel and natural wood as your main colors, use gray gravel or concrete pavers for the base to keep things cohesive and modern.
2. Keep Furniture Simple:
Skip the bulky cabinetry, a basic wooden frame holds the sink and gives you shelf space underneath for storage bins or buckets.
3. Mix Textures:
Pair the smooth metal of the sink with rough, unfinished wood, and balance it out with soft plastic storage bins for contrast.
4. Minimal Decor:
Let the essential tools double as decor — hang a couple of metal utensils on hooks, or add a small potted herb for a pop of green.
5. Portable Cooking:
A compact propane grill is your best friend here, it fits right in and keeps the kitchen flexible and easy to rearrange.
16. DIY Pizza Oven
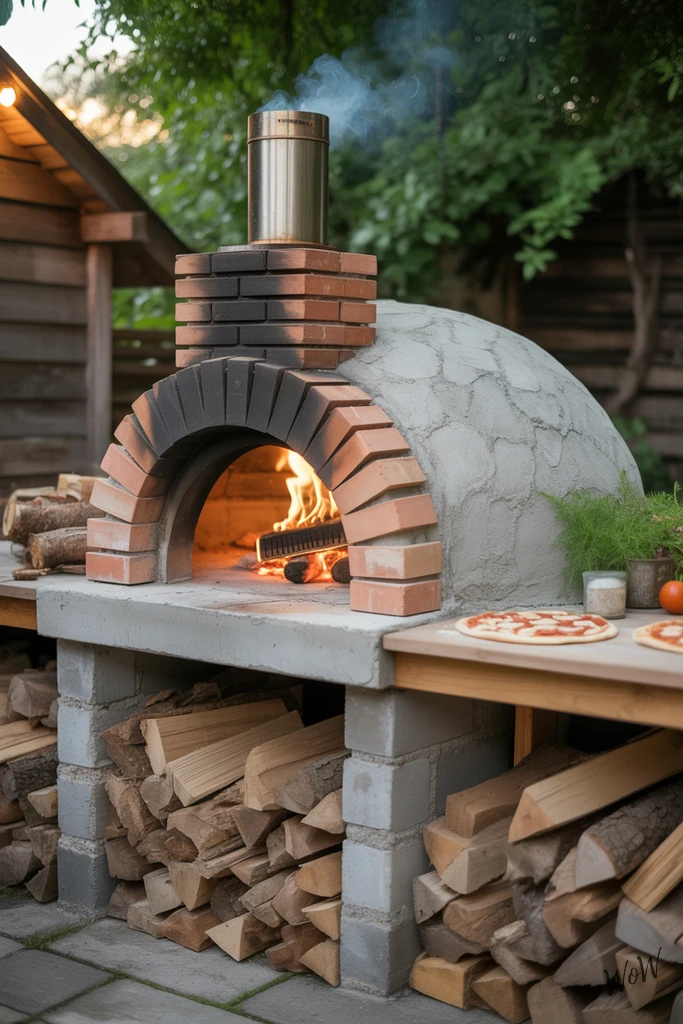
Turn your backyard into a pizza lover’s paradise with a rustic DIY pizza oven. Grab some reclaimed bricks and concrete blocks to build the base—these materials not only keep costs down, they give your oven tons of character.
Shape a simple dome from fire-resistant materials (like firebricks and clay), let it dry, then finish with a weathered plaster for that old-world charm. Stack firewood nearby for both style and easy access, and set up a wooden prep area for toppings and fresh dough. With the golden glow of evening light, you’ll want to invite everyone over for pizza night.
Tips to Get This Look
1. Go Warm with Color
Stick to earthy tones—think terracotta, brick red, and sandy beige. These colors make your setup feel welcoming and blend perfectly with a backyard setting.
2. Mix Up Textures
Combine rough, weathered brick with a smooth plaster dome, it adds visual interest and that “built-by-hand” vibe.
3. Simple Wooden Furniture
Choose a basic wooden prep table or bench, unfinished or lightly stained wood works best for a laid-back, rustic style.
4. Natural Decor
Add potted herbs (like basil or rosemary) and stack firewood around the oven. These touches are practical and they look great, too.
5. Keep Lighting Cozy
String up some warm fairy lights or use lanterns nearby. Soft lighting will highlight the oven’s texture and make evenings feel magical.
17. Upcycled Door Countertop
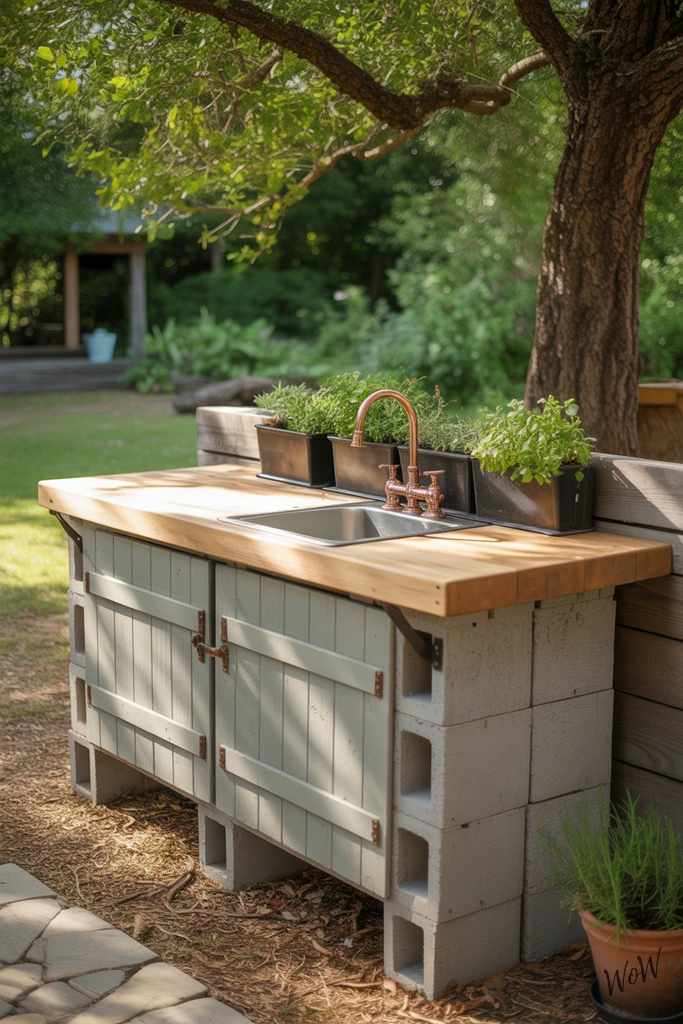
Give your outdoor kitchen character and history with a countertop made from an old wooden door. This project is easier than it looks: find a solid vintage door (skip anything with lots of rot or warping), sand it smooth, and treat it with a marine-grade sealer so it can withstand the elements. Secure the door to a sturdy cinder block base using metal L-brackets; you don’t need to be a pro carpenter, just make sure everything’s level.
For a functional upgrade, cut a hole for a sink and add copper fixtures—those warm metallics look gorgeous against weathered wood. Finish by lining the edge with potted herbs, you’ll love having fresh flavors right at your fingertips. Let dappled sunlight show off the door’s patina, every old scuff tells a story.
Tips to Get This Look
1. Go Bold with Contrast: Pair the door’s rich, aged wood with simple, raw cinder blocks for a cool mix of texture. Gray blocks make the wood pop.
2. Mix Vintage & Modern: Don’t worry if your fixtures are new—copper taps or a sleek, modern sink can make the old wood feel fresh instead of dated.
3. Seal the Deal: Use a high-gloss, marine-grade finish to protect the wood from rain and sun, and bring out the grain’s natural beauty.
4. Add Greenery: Line the countertop with a mix of potted herbs—basil, mint, and rosemary are easy, plus they smell great.
5. Layer in Soft Elements: Toss in a few outdoor cushions or a woven rug nearby, it makes the space feel cozy even if your kitchen’s simple.